So after the past few weeks of playing around with VMWare/ESXi in my homelab, and the spotty power here due to the weather (I really need to get Battery Backups), coupled with having to rebuild vCenter a handful of times due to the corruption after a power failure (unsure why), I’ve decided to take my hand at Hyper-V. Furthermore, I’m starting to dig into AZ-800 - Administering Windows Server Hybrid Core, AZ-801 - Configuring Windows Server Hybrid Advanced Services and AZ-900 - Microsoft Azure Fundamentals in order to get my feat wet in the Azure world…
Another catalyst in my decision to drop VMWare came from a few recent Reddit and LinkedIn Posts where employees (read: Talent) are leaving VMWare in droves and going to AWS and Microsoft, which is telling me that the Broadcom purchase is sending employees out the door quicker than expected.
Anyhow, it never hurts to always keep learning, and Windows Administration admittedtly isn’t my strongest suit. In this post I want to talk about installing Hyper-V 2019 Core (Although Server 2022 is out, Hyper-V 2022 Core does not exist, you have to install Server 2022 then install the Hyper-V role, which I don’t want to do.)
So lets get started:
Installing Hyper-v 2019 Core
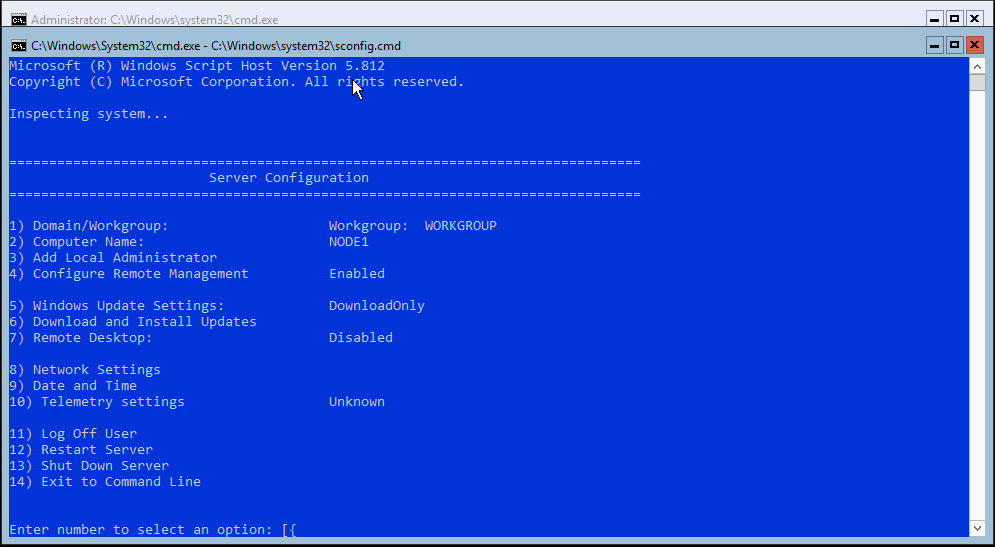
Start off with your typical bare metal installation, then set your password after first boot. Once you log in you will be presented in the “sconfig” screen

Lets go ahead and turn on the following:
- Remote Management - Yes
- Remote Desktop - Enabled
- Windows Update (Option 6) - Select (A) for All Updates
Then change your computer name (in my instance I renamed to “Node1”, “Node2”, and “Node3” respectively)
At this point , restart your server.
Upon restart, open a Powershell prompt (if Sconfig opens again, use selection ‘14’ then type “powershell)
Then in Powershell:
Enable-PSRemoting

Enable-WSManCredSSP -Role server
These two commands Allow Powershell Remoting and allow remote access on public zones and enable firewall rules for CredSSP/WinRM.

Now onto our Windows Machine
Windows Machine (Client)
Ensure your Windows PC is up to date as well. Both the Hyper-V Server and Windows PC much be up to date else bad things happen (They won’t communicate well).
Next lets install the Hyper-V Management Tools Feature. Two options here:
Start Menu -> Type “Add Features” and click “Turn Windows features on or off”
or using an Elevatated (Adminstrator) Powershell:
Enable-WindowsOptionalFeature -Online -FeatureName Microsoft-Hyper-V-Tools-All -All

You will need to restart after installation.
Next if your network isn’t set to private, lets do it now:
You can either:
Right click on your network adapter -> Open Network & Internet Settings -> Click on Properties then Select “Private”
Or
Using Powershell:
Set-NetConnectionProfile -InterfaceAlias Ethernet -NetworkCategory Private
Just ensure that your “InterfaceAlias is selected to the appropriate interface. Use:
Get-NetConnectionProfile
To figure out what connections are available and what they are currently set to…
Now lets add our Hyper-v Host(s) to our local “Hosts” file.
Two ways of doing this again:
Edit directly with notepad C:\Windows\System32\drivers\etc\hosts

Or use powershell:
Add-Content -Path C:\Windows\System32\drivers\etc\hosts -Value "`n10.10.0.5`tnode1"
Replace 10.10.0.5 with your ip address of your server Replace “node1” with your servers hostname
n is 'New Line'
t is ‘New Tab’
Now lets configure the Remote Management Service (We need an Administrative Powershell for this)
winrm quickconfig
Press ‘Y’ when prompted
If you get an error, such as
WinRM service is already running on this machine.
WSManFault
    Message
        ProviderFault
            WSManFault
                Message = WinRM firewall exception will not work since one of the network connection types on this machine is set to Public. Change the network connection type to either Domain or Private and try again.

Error number:  -2144108183 0x80338169
WinRM firewall exception will not work since one of the network connection types on this machine is set to Public. Change the network connection type to either Domain or Private and try again.
 And you checked ALL of your adapaters using
Get-NetAdapters
But everything looks to be set to Private. Check to see if any Adapters exist for WSL OR VPN’s and disable them manually. Re-enable them afterwards.
 then
then
Set-Item WSMan:\localhost\Client\TrustedHosts -Value "node1"
(Replace ‘node1’ with your server’s hostname)
and then
Enable-WSManCredSSP -Role client -DelegateComputer "node1"
(This allows the Windows 10 Credentials to be delegated to the Hyper-V host)
Finally in Powershell
New-Item -Path "HKLM:\SOFTWARE\Policies\Microsoft\Windows\" -Name 'CredentialsDelegation'
New-ItemProperty -Path "HKLM:\SOFTWARE\Policies\Microsoft\Windows\CredentialsDelegation\" -Name 'AllowFreshCredentialsWhenNTLMOnly' -PropertyType DWord -Value "00000001"
New-ItemProperty -Path "HKLM:\SOFTWARE\Policies\Microsoft\Windows\CredentialsDelegation\" -Name 'ConcatenateDefaults_AllowFreshNTLMOnly' -PropertyType DWord -Value "00000001"
New-Item -Path "HKLM:\SOFTWARE\Policies\Microsoft\Windows\CredentialsDelegation\" -Name 'AllowFreshCredentialsWhenNTLMOnly'
New-ItemProperty -Path "HKLM:\SOFTWARE\Policies\Microsoft\Windows\CredentialsDelegation\AllowFreshCredentialsWhenNTLMOnly\" -Name '1' -Value "wsman/node1"
The above commands modify the local group policy and “Allow delegating fresh credentials with NTLM-only server authentication”
Now lets open Hyper-V Server manager and connect:

For Username use “hostname\username” and your password