Preface:
Rebuilding the Homelab time, and what better way than to start at your firewall/router. Earlier this week a series of events led me down to this path, one of which was the router/firewall dying, then it snowballed into other matters. I’ve read many reviews on Reddit and other forums about how firewalls/routers should be “Hardware” only, but yet, when it comes to cloud infrastructures, we aren’t running our virtual firewalls/routers on hardware only (Hello McFly!). Besides, what is better than one form of backup when you can have two forms (I’ll explain this later.)
What was I running before?
Before, on my trusty Dell Optiplex 3020, I was running pfSense on “dedicated hardware” (Baremetal), and running weekly backups of my config/xml onto my NAS storage device (with hopes that it would do what it is designed to do, and back up to SnapRaid, and then back any critical files to a USB drive, then I physically change those out monthly and carry it offsite to another place which I hope doesn’t burn down…). This piece of hardware was running what I assumed to be 8GB of RAM (I had it installed) an i3-4300 processor, a broadcom server-grade 4 port gigabit adapter, and purred along nicely.
When I rebuilt my router the other day I realized that my 8GB was really not even reporting 8GB… This was due to pins 5 and 6 on the 4 port gigabit adapter (being server grade) causing weird SMBus issues with Haswell processor boards (cheap Optiplex boards) and a hack needed to be done. (Here starts the snowball effect) The solution? Electrical tape… I did not get a photo of this but I taped off pins 5 and 6, which worked and I saw 8GB come back (very nice).
But pfSense doesn’t need 8GB, thats overkill you say?… Why yes, yes it is…
So what do Homelab tinkerer’s do? We have to over-engineer things and have them do more than they really should do…
Enter Proxmox
So it’s time to virtualize pfSense. Why? Because I can, and because while theres a lot of love for pfBlockerNG, which I used for a while, I want PiHole. It (to me) offers more granualarity in a more user-friendly dashboard for my devices on my network and I want something that works better (imo, don’t shoot me). I wanted something I can set up groups on for different clients, for different blocklists, and have nice graphs to go along with it. I also wanted a solution to have PiHole and pfSense on the same box.
Now some may say “but Justin, you should have your PiHole on a separate device in case you need to take your hypervisor down for maintenance, that way your internet is still working…” … If this box dies, I have no internet regardless. I don’t see a need to separate PiHole off this box.
There are some added benefits to having these items virtualized however:
Snapshots: I can snapshot both the LXC (PiHole) and the pfSense VM and back them up to a USB Drive attached to the Optiplex Server, AND back them up to my home server NAS (Nice).
Future proofing (and availability): I can get another Optiplex and run two pfSense boxes for failover with CARP (I may do this) OR I can easily move the VM to a new machine and drag along the VLAN’s to a new machine on my network with near zero downtime (nice).
Temporary Hypervisor to drag VM’s to: If needed in the future, if I needed to dump VM’s on this hypervisor in an emergency situation (taking a proxmox node down but need to have a running service up than can be migrated) this is an additional always-on node.
How did I do this?
Simple. I loaded up my Ventoy USB with the latest Proxmox ISO and booted up my Optiplex. Went through the installation of Proxmox (see Installing Proxmox (bye bye ESXi) for a walkthrough). However we get into the Chicken-Egg scenario when it comes to networking. As this is the first node on the network, I needed to be creative with the IP Addressing. I also had to consider my backup for pfSense and current VLANs in place.
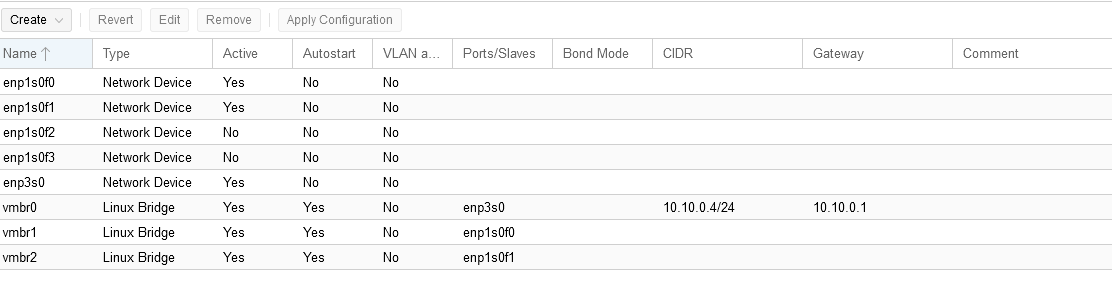
During the install I chose to use the IP Address of 10.10.0.4 for my Proxmox Node (the others were already taken up via Static IP Addressing, these were the network switch and wireless AP). I went through the install process as normal, rebooted and was greeted with the blank terminal screen with the login information (sans password of course).
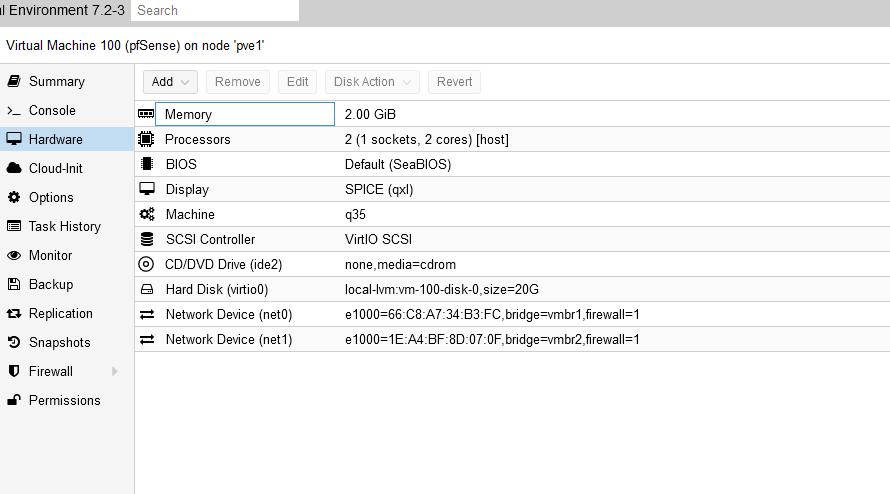
Next was time to load up pfSense. I also had this on my Ventoy USB drive, so I just transferred this to the ISO “drive” on proxmox and installed it from there. I also utilized the following settings:
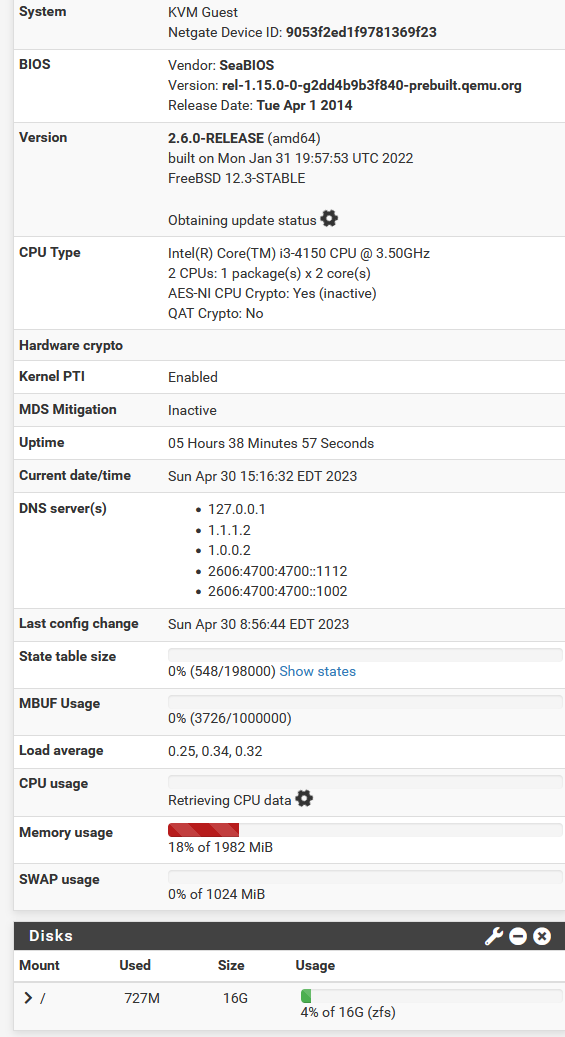
Memory: 2GB
Processors: 2 (1 Socket/2Core)
Bios: Default (SeaBIOS)
Display: Spice (Note: This saves on resources)
Two Network Devices - Bridged from the gigabit adapter, and SEPARATE from the Proxmox Administrator port. Also DO NOT assign an ip address to these bridges
Once installed, I loaded my backup, made necessary changes to my VLAN’s to the new interfaces, and was back up and running within minutes.
PiHole
Now it’s time to disable my pfBlockerNG and spin up PiHole within an LXC. PiHole is an all in one DNS Blackhole that “protects” your network from advertisements, malvertisements, and much more. I use “protect” loosely here because, as we all know, end users can still do malicious stuff inadvertantly. However this is to stop those ad’s for me/my family, as well as keep a closer eye on my childrens network. Read more on PiHole here.
We are going to run this in an LXC as noted above. This is simple stuff. Log into your shell (ssh or direct) of your Proxmox machine, and type in
pveam update
Next, within your GUI, go to your “Local” disk, and click on “Templates”. I personally use Ubuntu 22.04, but you can use whatever flavor you want. Download your preferred LXC template, and then click “Create CT” to create a new Proxmox Container. My PiHole LXC Container is using 1 gig of ram, 512 MB of Swap (not really needed, it just defaulted to it) and 1 processing core. It also has 10 GB disk space and I gave it a static IP address (!! Important, as for a DNS server you don’t want this changing and PiHole will gripe about not having a static IP !!). Once loaded you are presented with a terminal within the GUI. You could set up SSH access to this (I personally don’t, as I will probably never SSH to this directly) but if you feel the need, go for it.
First things first, this is going to need updates:
apt update
apt upgrade
Next we have a one liner to install PiHole. Now a lot of people (cybersecurity minded) are going to say “Oh my gosh, you piped a command directly to bash that you downloaded from the internet!” . Yes, yes I did, but I also know what’s in their package.
curl -sSL https://install.pi-hole.net | bash
You’ll be presented with some pre-flight checks, and it’s going to ask for your upstream DNS providers. I chose to use my pfSense Firewall IP Address (10.10.0.1) since it’s up and running already and it’s part of the setup anyhow to forward to Cloudflare.
Next it’ll ask to preload some blocklist, go ahead and accept them, and accept defaults for the remainder of the setup. Your next step is to log into the PiHole interface with the password that it presents on the last screen. If you want to change your password, use:
pihole -a -p
then change your password to something more memorable (like Password123) … just kidding.
A few things we need to set in PiHole to work with pfSense.
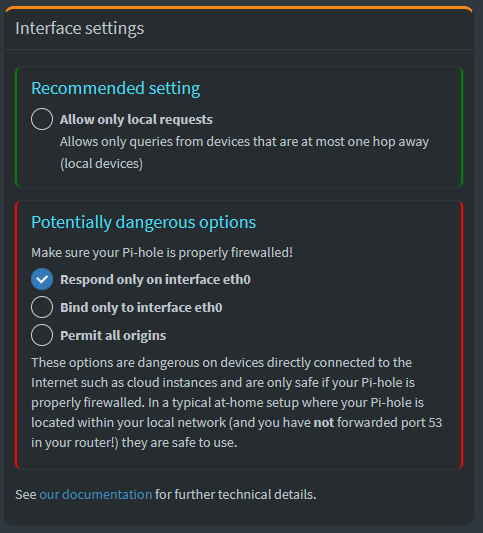
In Settings -> DNS: Under “Potentially Dangerous Options”: Select “Respond only on Interface Eth0” or whatever your interface is. This is Optional, however when using VLAN’s I found in my environment that when I was jumping over VLAN’s to this network PiHole had a fit.
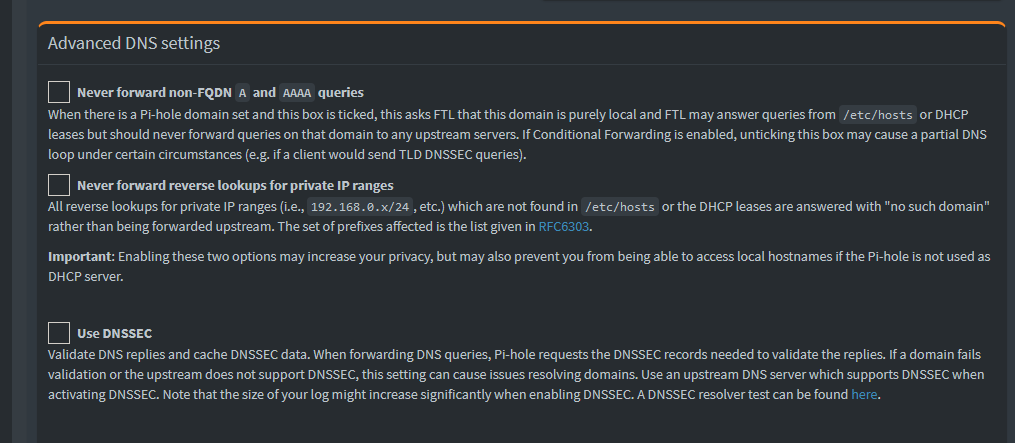
In the same screen just below it, uncheck “Never forward non-FQDN A and AAAA queries” and “Never forward reverse lookups for private IP ranges”. These settings help with DNS Names between PiHole and pfSense (so you can track hosts in PiHole)
Now onto pfSense Settings:
If you are using pfSense for DHCP, set each VLAN up (that you want to use) to use the new PiHole DNS Server (DHCP Settings - Under the DNS Fields enter your IP Address for your PiHole here). I also disabled pfBlockerNG, and unchecked the setting to “save” all of the settings when reinstalling/uninstalling the application for pfBlockerNG.
You may need to reboot everything (including endpoints, unless you flushDNS records / release/renew IP addresses) to get it all to work. If successful you should start getting responses within your PiHole interface, and now have an all in one DNS/Firewall box, where you can take Snapshots in Proxmox, backup configurations, etc.
Backing this all up
I had a spare USB drive sitting around that was doing nothing but collecting dust, so I formatted it in Proxmox, and installed it, assigned it as a directory, and gave it permissions to be a VM/CT Backup space
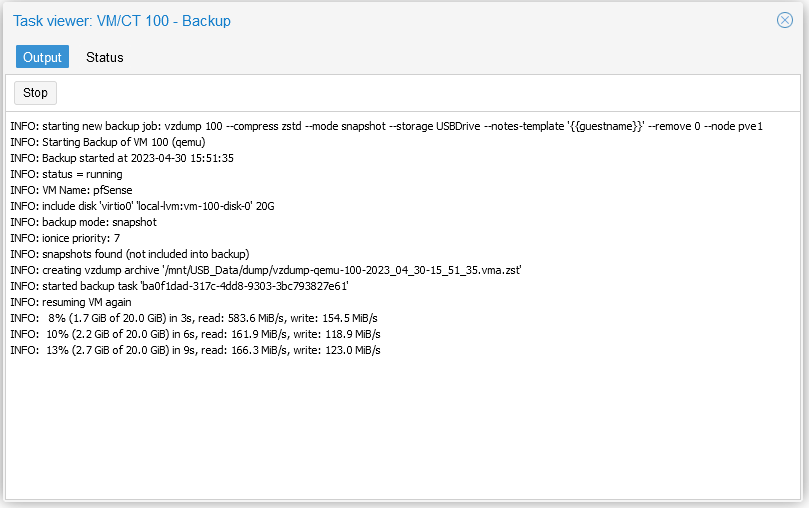
You can also schedule/automate these backups (and read all about them here).
The beauty about these backups is that if and when this ever goes down, I can immediately respin up Proxmox in a new machine and reload from backup, remap my network devices and I’m back up and running again. I can also back up my pfSense configuration for redundancy.
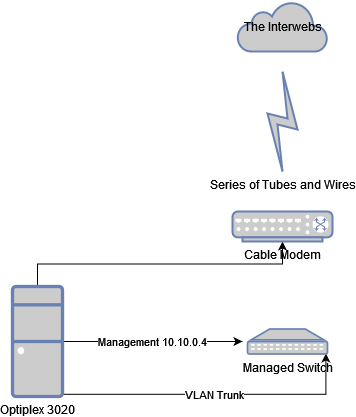
And here is a cheap diagram of how this is set up
