
Terraform is a CI/CD tool that has been been around for a while that is developed by Hashicorp and is an industry standard when it comes to IAC (Infrastructure as Code).
 It integrates really well with all of the Cloud Providers, as well as Docker and Proxmox, which is what we will be connecting it to today, however first we need to set up a service account in Proxmox in order for Terraform to communicate to our Proxmox Node, lets SSH into Proxmox and run some commands to create the role with permissions, add the service account to the role, and generate the API token:
$ useradd terraform

# We have to create a linux user first before we can add it in PVE User Manager else we can't assign it a password

$ pveum role add TfRole -privs "VM.Allocate VM.Clone VM.Config.CDROM VM.Config.CPU VM.Config.Cloudinit VM.Config.Disk VM.Config.HWType VM.Config.Memory VM.Config.Network VM.Config.Options VM.Monitor VM.Audit VM.PowerMgmt Datastore.AllocateSpace Datastore.Audit"
$ pveum user add terraform@pam
$ pveum passwd terraform@pam

# Enter password:

$ pveum aclmod / -user terraform@pam -role TfRole
$ pveum user token add terraform@pam terraform

#Token is provided, copy this down
Make sure we copy the API Token it generates and save it.
Now back to VS Code, I’m going to export the Username and API to my Terraform “Control Node” (i.e. my desktop, as I am SSH’d from my laptop to my desktop using VS Code and want my Desktop to hold all of these variables). Open a terminal in VS Code (and since I use zsh):
$ nano ~/.zshrc
Inside of your .zshrc file:
Then
$ source ~/.zshrc
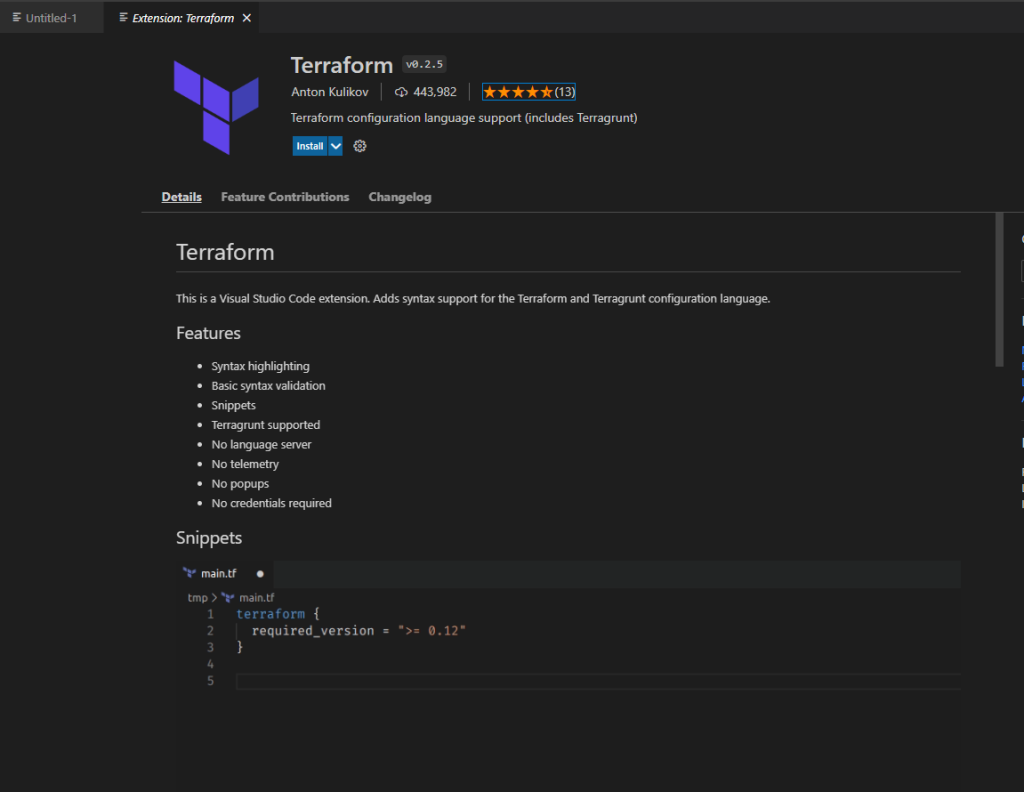
Also in VS code we will install the Terraform VS Code Extension. Except we will use Anton K’s version, not Hashicorps extension, because of the memory bugs and autocomplete issues described in the recent reviews.
Terraform has three main stages of deployment, an Init stage, a plan stage and an apply stage. We will start with the plans and creating a new directory for Terraform to store some configuration files (which will be also found here https://github.com/initcyber/HomeInfastructure. We will create three files, provider.tf, ubuntu-clone.tf, and credentials.auto.tfvars. A breakdown of what these are:
| provider.tf – defines variables that we will use as well as the script we will pull from Hashicorps website (in this case 2.9.10 ([Docs overview | Telmate/proxmox](https://registry.terraform.io/providers/Telmate/proxmox/latest/docs)) |
ubuntu-clone.tf – This is the main file we are using to set up our virtual machines
credentials.auto.tfvars – this is our variables file – we set variables here that we don’t change often (this is our hostname, API keys, etc.
First create a file called “credentials.auto.tfvars“:

Next let’s create our provider.tf file:

# Proxmox Provider
# ---
# Initial Provider Configuration for Proxmox

terraform {

    required_version = ">= 0.13.0"

    required_providers {
        proxmox = {
            source = "telmate/proxmox"
            version = "2.9.10" # Latest as of 7/18/2022
        }
    }
}

# Variables below defined in credential.auto.tfvars
variable "proxmox_api_url" {
    type = string
}

variable "proxmox_api_token_id" {
    type = string
}

variable "proxmox_api_token_secret" {
    type = string
}

variable "ubuntu_22_template" {
    type = string
}

provider "proxmox" {

    pm_api_url = var.proxmox_api_url
    pm_api_token_id = var.proxmox_api_token_id
    pm_api_token_secret = var.proxmox_api_token_secret

    # (Optional) Skip TLS Verification
    # pm_tls_insecure = true

}
After we create this let’s run:
$ terraform init
To test out the configuration to ensure that everything is working as should (initially).

| Next, we create our ubuntu-clone.tf file. This file defines the virtual machine(s) we create. For references on variables, we can refer to here [proxmox_vm_qemu | Resources](https://registry.terraform.io/providers/Telmate/proxmox/latest/docs/resources/vm_qemu) : |
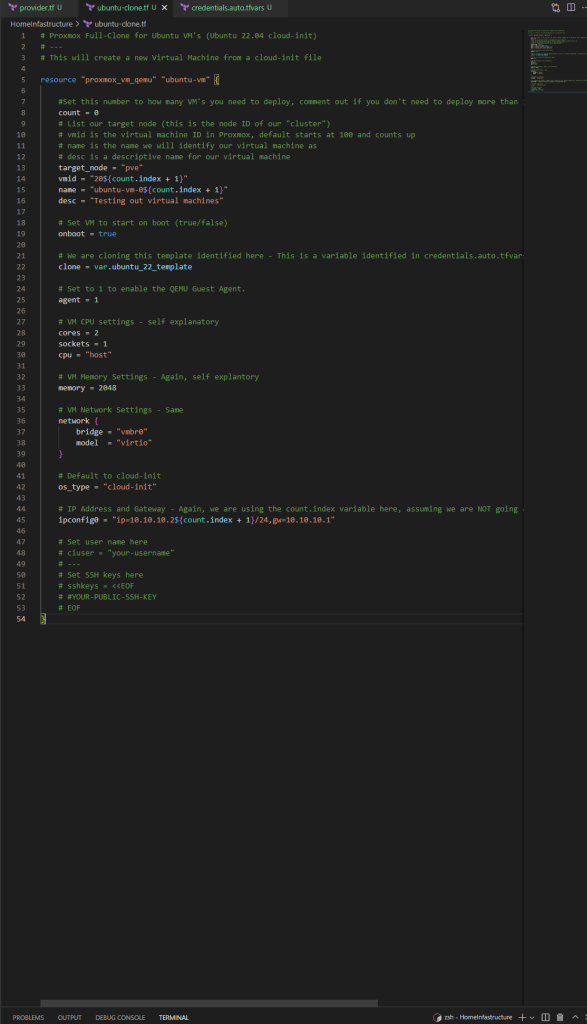
# Proxmox Full-Clone for Ubuntu VM's (Ubuntu 22.04 cloud-init)
# ---
# This will create a new Virtual Machine from a cloud-init file

resource "proxmox_vm_qemu" "ubuntu-vm" {

    #Set this number to how many VM's you need to deploy, comment out if you don't need to deploy more than 1 (adjust "vmid" and "name" as needed)
    count = 1
    # List our target node (this is the node ID of our "cluster")
    # vmid is the virtual machine ID in Proxmox, default starts at 100 and counts up
    # name is the name we will identify our virtual machine as
    # desc is a descriptive name for our virtual machine
    target_node = "pve"
    vmid = "20${count.index + 1}"
    name = "ubuntu-vm-0${count.index + 1}"
    desc = "Testing out virtual machines"

    # Set VM to start on boot (true/false)
    onboot = true

    # We are cloning this template identified here - This is a variable identified in credentials.auto.tfvars
    clone = var.ubuntu_22_template

    # Set to 1 to enable the QEMU Guest Agent.
    agent = 1

    # VM CPU settings - self explanatory
    cores = 2
    sockets = 1
    cpu = "host"

    # VM Memory Settings - Again, self explantory
    memory = 2048

    # VM Network Settings - Same
    network {
        bridge = "vmbr0"
        model  = "virtio"
    }

    # Default to cloud-init
    os_type = "cloud-init"

    # IP Address and Gateway - Again, we are using the count.index variable here, assuming we are NOT going above 10 virtual machines this should be OK.
    ipconfig0 = "ip=10.10.10.2${count.index + 1}/24,gw=10.10.10.1"

    # Set user name here
    # ciuser = "your-username"
    # ---
    # Set SSH keys here
    # sshkeys = <<EOF
    # #YOUR-PUBLIC-SSH-KEY
    # EOF
}
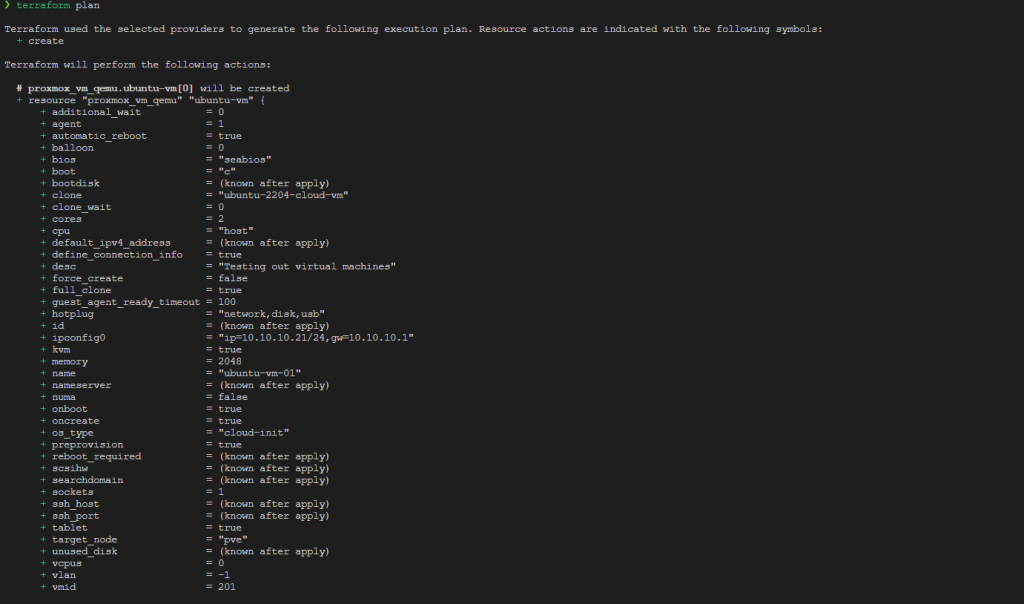
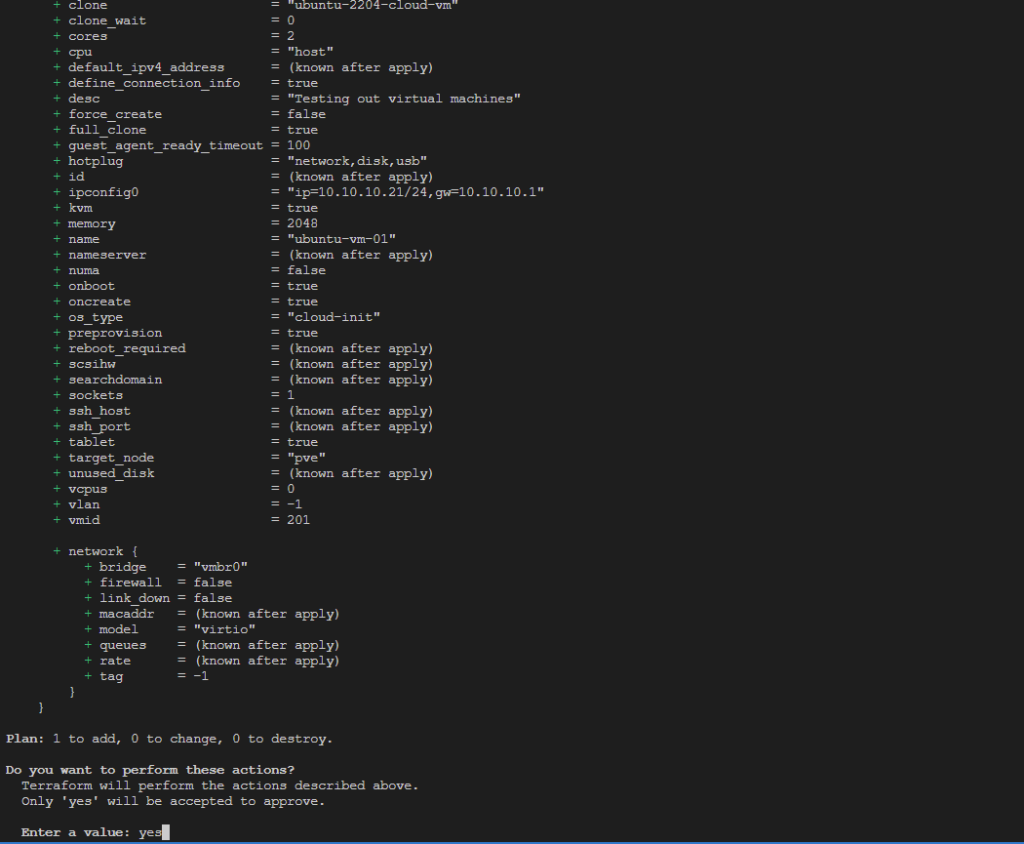
Now we test out our “plan” phase. Back to our VS Code Terminal and within the same folder:
You output should look similar to this:
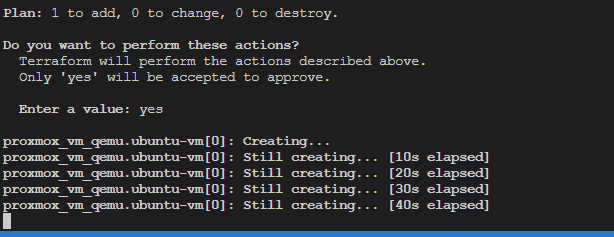
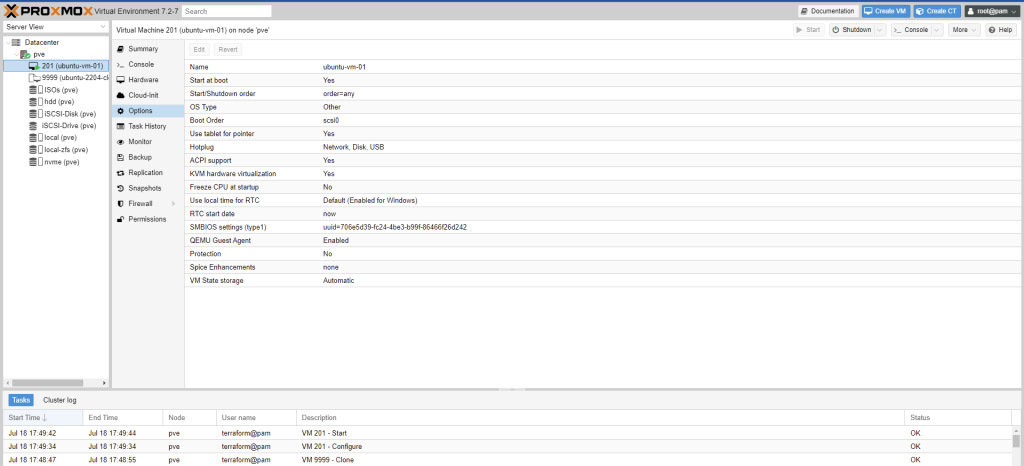
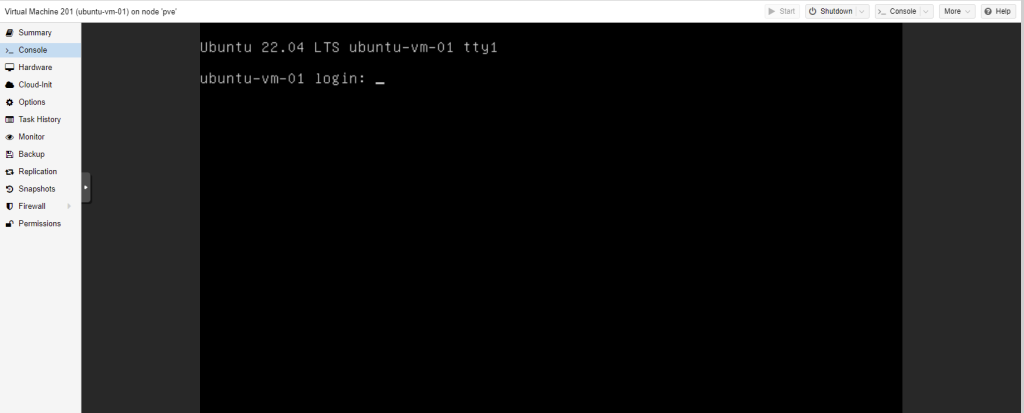
Then we simply do “Terraform Apply” and if everything is set correctly:
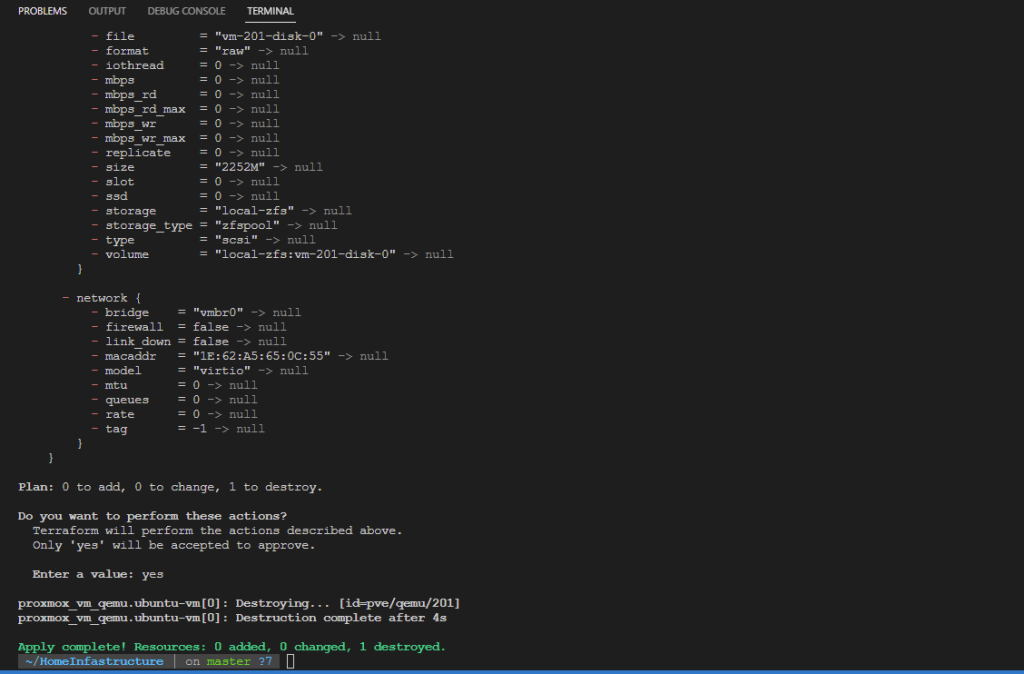
That’s great and all, but I’ve done all this work, how do I destroy the VM’s now if this is all “Infrastructure as Code”? Well that’s simple, you click on the top and shut it down, one by one and then you simply destroy the vm’s one by one, even when you create 100 of them…
Just kidding, remember the “Count” variable we made above? Set that to “0” and rerun “terraform apply” and watch the magic.
This is just a simple example of Terraform creating an Ubuntu VM from a cloud-init template, however when it comes to writing your entire infrastructure as code, you can simply write out your entire homelab in a file, and bring it up, and tear it down as you please all with a simple command. Some caveats however are just to be sure that you are careful with your disk selection (and using the appropriate disk storage/etc) as to not overprovision, and to carefully network everything. Obviously this example is for someone looking to scale out their VM’s, such as in a production environment where multiple VM’s are needed (let’s say for a load-balanced situation, where we would have another Ansible playbook behind to configure everything or similar configuration management tool to set everything up), but even for a homelab environment you can set up everything via code, that way if anything happens you can easily tear it down and rebuilt without having to reinstall the OS manually each time.
Edit 09/18/2022
I made mention of the “Count” variable above which is absolutely great for any infrastructure that is not relying on VM’s that are not expected to play a vital role/you don’t care if they are recreated (i.e. those VM’s that are doing simple tasks, such as microservices). However for VM’s such as servers that need to perform a task, hold some information that can not be changed easily, and or you don’t want to rely on an Ansible script each time to be ran if it was destroyed and rebuilt, please use the “For Each” statement instead of “Count”. It will save you heart ache. I later found this out and have since changed over. I will submit an updated blog post later when I get everything transferred over to GH Pages/Jekyll from my Wordpress CMS.