Terraform (which will be discussed in greater detail in Part 2 of this mini-blog series – tomorrow) is a CI/CD tool that is pretty much the de-facto standard for Infrastructure as Code (IAC), and is something I decided to start learning as part of my homelab, however some pre-requisites are needed in order to start using Terraform, one of which was setting up Proxmox (at least in my use-case – see yesterday’s blog post), the other being setting up a cloud-init VM. What is Cloud-Init and why do we need it?
According to Cloud Init
Long story short – It automates the system configuration during the initial boot of the VM. A bunch of the major distributions come pre-packaged and ready for cloud-init. Lets set one up now for Ubuntu. The latest cloud-init ready image according to Ubuntu.com’s page is 22.04 (Jammy) – (https://cloud-images.ubuntu.com). On our Proxmox machine (ssh to it):
$ wget https://cloud-images.ubuntu.com/jammy/current/jammy-server-cloudimg-amd64.img
Next we need to install qemu-guest-agent into the newly downloaded cloud image. We only need to download libguestfs-tools once onto Proxmox but any cloud image we download we download we can assume doesn’t have qemu-guest-agent installed on the cloud agent. This is needed for Teraform to function correctly (virt-customize is the tool):
$ apt update

$ apt install libguestfs-tools
Once the tools are installed, lets inject the qemu-guest-agent into the image
$ virt-customize -a jammy-server-cloudimg-amd64.img --install qemu-guest-agent
At this point I also want to inject SSH Keys into my cloud-init images (obviously adjust this to your own directories). Yes stuff is stored on my Proxmox root for time being, sue me.
$ virt-customize -a jammy-server-cloudimg-amd64.img --run-command 'useradd justin'
$ virt-customize -a jammy-server-cloudimg-amd64.img --run-command 'mkdir -p /home/justin/.ssh'
$ virt-customize -a jammy-server-cloudimg-amd64.img --ssh-inject justin:file:/root/.ssh/id_rsa.pub
$ virt-customize -a jammy-server-cloudimg-amd64.img --run-command 'chown -R justin:justin /home/justin'
Now lets create our Proxmox virtual machine with this cloud-init image that we just made. Make sure that the hard drive and network settings match your environment in Proxmox. I’m setting the VM number to 9999 because it’s a really high number and way out of the range of numbers that Proxmox will use to automatically chose when you create a VM/container. That and I’ll know it’s a cloud-init VM by seeing this high number and hopefully won’t destroy this on accident.
$ qm create 9999 --name "ubuntu-2204-cloud-vm" --memory 2048 --cores 2 --net0 virtio,bridge=vmbr0
$ qm importdisk 9999 jammy-server-cloudimg-amd64.img local-zfs
$ qm set 9999 --scsihw virtio-scsi-pci --scsi0 local-zfs:vm-9999-disk-0
$ qm set 9999 --boot c --bootdisk scsi0
$ qm set 9999 --ide2 local-zfs:cloudinit
$ qm set 9999 --serial0 socket --vga serial0
$ qm set 9999 --agent enabled=1
$ qm template 9999
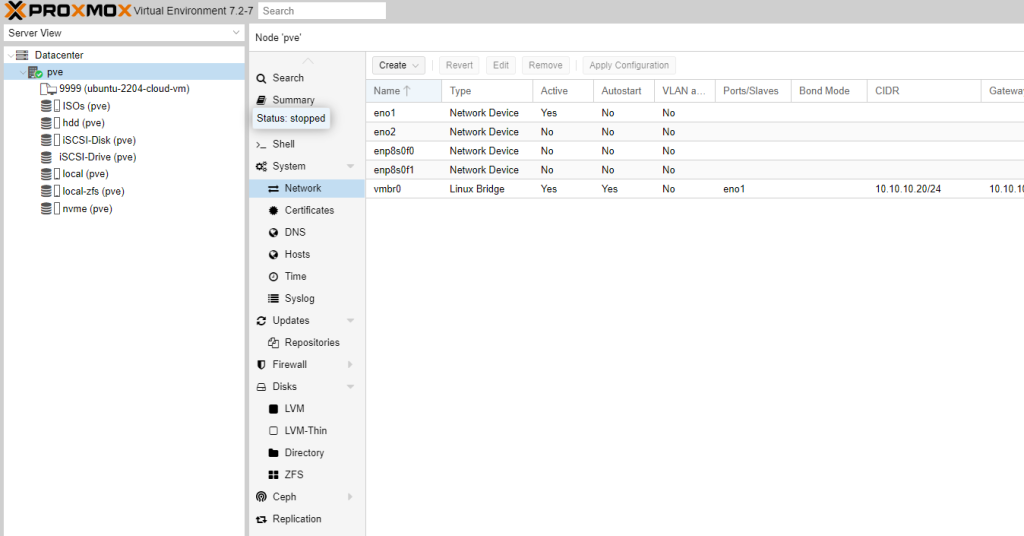
Now lets check our Proxmox Gui:
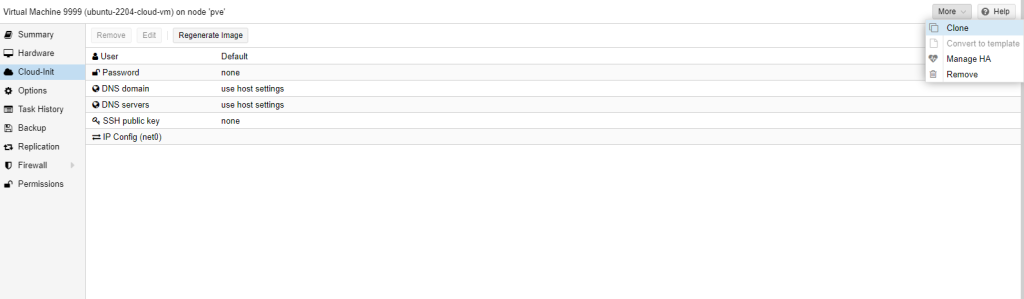
So maybe you made it to this point and you are saying “Ok that’s cool, now what can you do with this template?”. Well you can do several things. You can use this as a quick way to deploy VM’s going forward (just adjust parameters) or for your Infrastructure as Code (Terraform), which is more precisely what I want to use it for. However, for funsies let’s try using this template without Terraform.
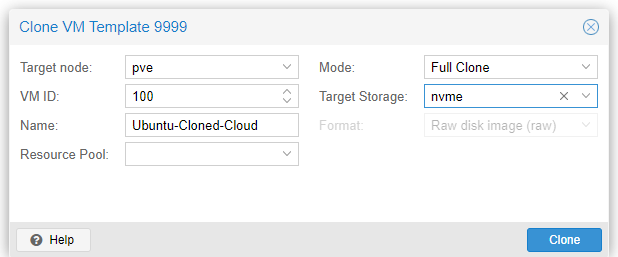
From the GUI - Select More then “Clone”:
 Select Linked Clone for same storage or Full Clone to select different storage
 In the new VM, under cloud-init set your User and Password, and DNS settings/SSH keys if needed
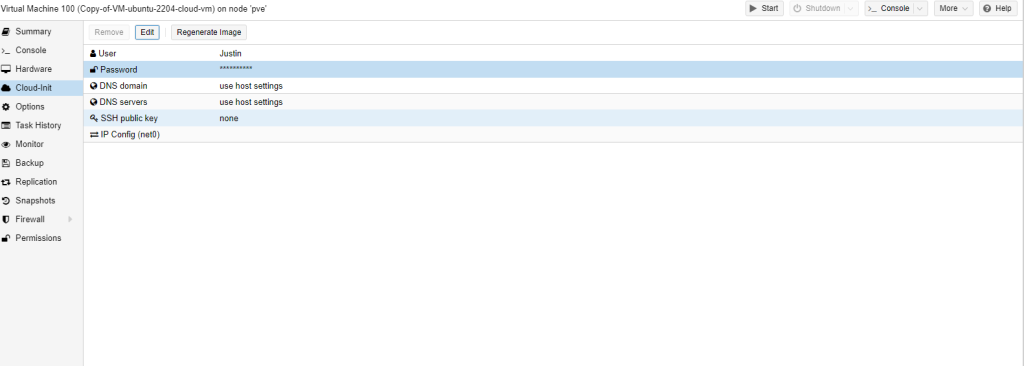
Afterwards, click Start then you have a working Virtual Machine from your Cloud-init Clone. Really Fast VM startup and you don’t have to go through an ENTIRE INSTALL, this is absolutely insane!